Notifications
This article provides a comprehensive guide for effectively viewing, managing, and customizing notifications within the Shasta Cloud Portal. It covers step-by-step instructions for accessing notifications, filtering actionable and historical notifications, searching and customizing views, and acknowledging notifications manually or in bulk. Additionally, it outlines details on exporting notification data and includes a breakdown of column information for better understanding.
TABLE OF CONTENTS
Prerequisites
- Login to the Shasta Cloud Portal
- You can be in Any View (Business/Deployment/Network) to see the Notifications
- Definitions
- Actionable Notifications – Notifications that are currently active and require attention or action from the MSP/Business Admin.
- Historical Notifications – Notifications that have been acknowledged or are no longer actionable because the associated alarm or issue has been resolved, moving them to the historical category.
Step-by-Step Instructions
Viewing the Notifications
Step-1: Navigate to the left menu and select Notifications. This will display the Notifications in a table view on the right-side page, followed by additional details below. If there are no active Notifications, the table content will show the message: "No Notifications Present."
The default filter that is set is “Actionable”.
Step-2: To view the historical notifications, click the quick filter “Historical”
Note: there might be more notifications than a single page can list out, so to view more, please scroll down and wait for few seconds that the page will load the rest of the entries below it.
Step-3: To search for notifications with a certain string to narrow down the notifications, please use the search Text box at the top. The text that matches in the columns that support the search will all be displayed.
To refresh the list to update with the latest, you can use the table refresh icon to load the fresh notifications.
Customizing the Notifications view
Step-1: To filter out specific Notification, please click on custom filter button located after the Actionable and historical quick filter, and you can narrow your notification search.

 Step-2: Select the necessary criteria and fields to filter, and Click Apply. As an example, when selecting only Critical Notifications (Notification Severity), only critical notifications will be displayed.
Column information
Column Name | Type | Description | Hide able | Filter | Sorting | Search | Hover action | Click action |
Type | Icon | The type of the notification (Alarm, Notification, Ticket). | Yes | Yes | Yes | No | No | No |
ID | Text | The Id of the notification. | ||||||
This is usually a combination of a Type and Number (Alphanumeric) | No | No | Yes | Yes | Yes | |||
Displays alarm summary. | Yes - Only for Tickets | |||||||
Affects | Text | The type of entity that is affected | Yes | Yes | No | Yes | No | Yes, Clicking takes towards Org or Venue |
Summary | Text | The summary of the notification | Yes | No | Yes | Yes | Yes | |
Shows more details that is relevant to the summary. | No | |||||||
Organization | Text | The description of the notifications | Yes | Yes | Yes | Yes | No | Yes, Clicking takes towards Org |
Venue | Text | The venue details related to the affected entity. | Yes | Yes | No | Yes | No | Yes, Clicking takes towards Venue |
Created | Time | The timestamp at which the notification is created. | Yes | No | Yes | No | Yes. Shows the time | No |
Severity | Categorical | The severity of the notification (Minor, Major, Critical) | Yes | Yes | Yes | No | No | No |
Notifications acknowledgement
Actionable notifications will remain in an active state unless one of the following conditions is met:
- Automatic Clearance – If a notification, such as an infrastructure offline alert, is resolved automatically (e.g., the infrastructure comes back online), it will be moved to the Historical category.
- Manual Acknowledgment – Users can manually acknowledge individual notifications or multiple notifications, marking them as no longer actionable.
Steps for manually acknowledging the notifications are mentioned below.
Step-1: Go to the Actionable notifications view, and towards the end of the row listing of a certain item, click the breadcrumb icon to see the Option of Acknowledging that Notification.

This will open up the confirmation window.
Step-2: Accept the confirmation dialog by clicking on to “Acknowledge”

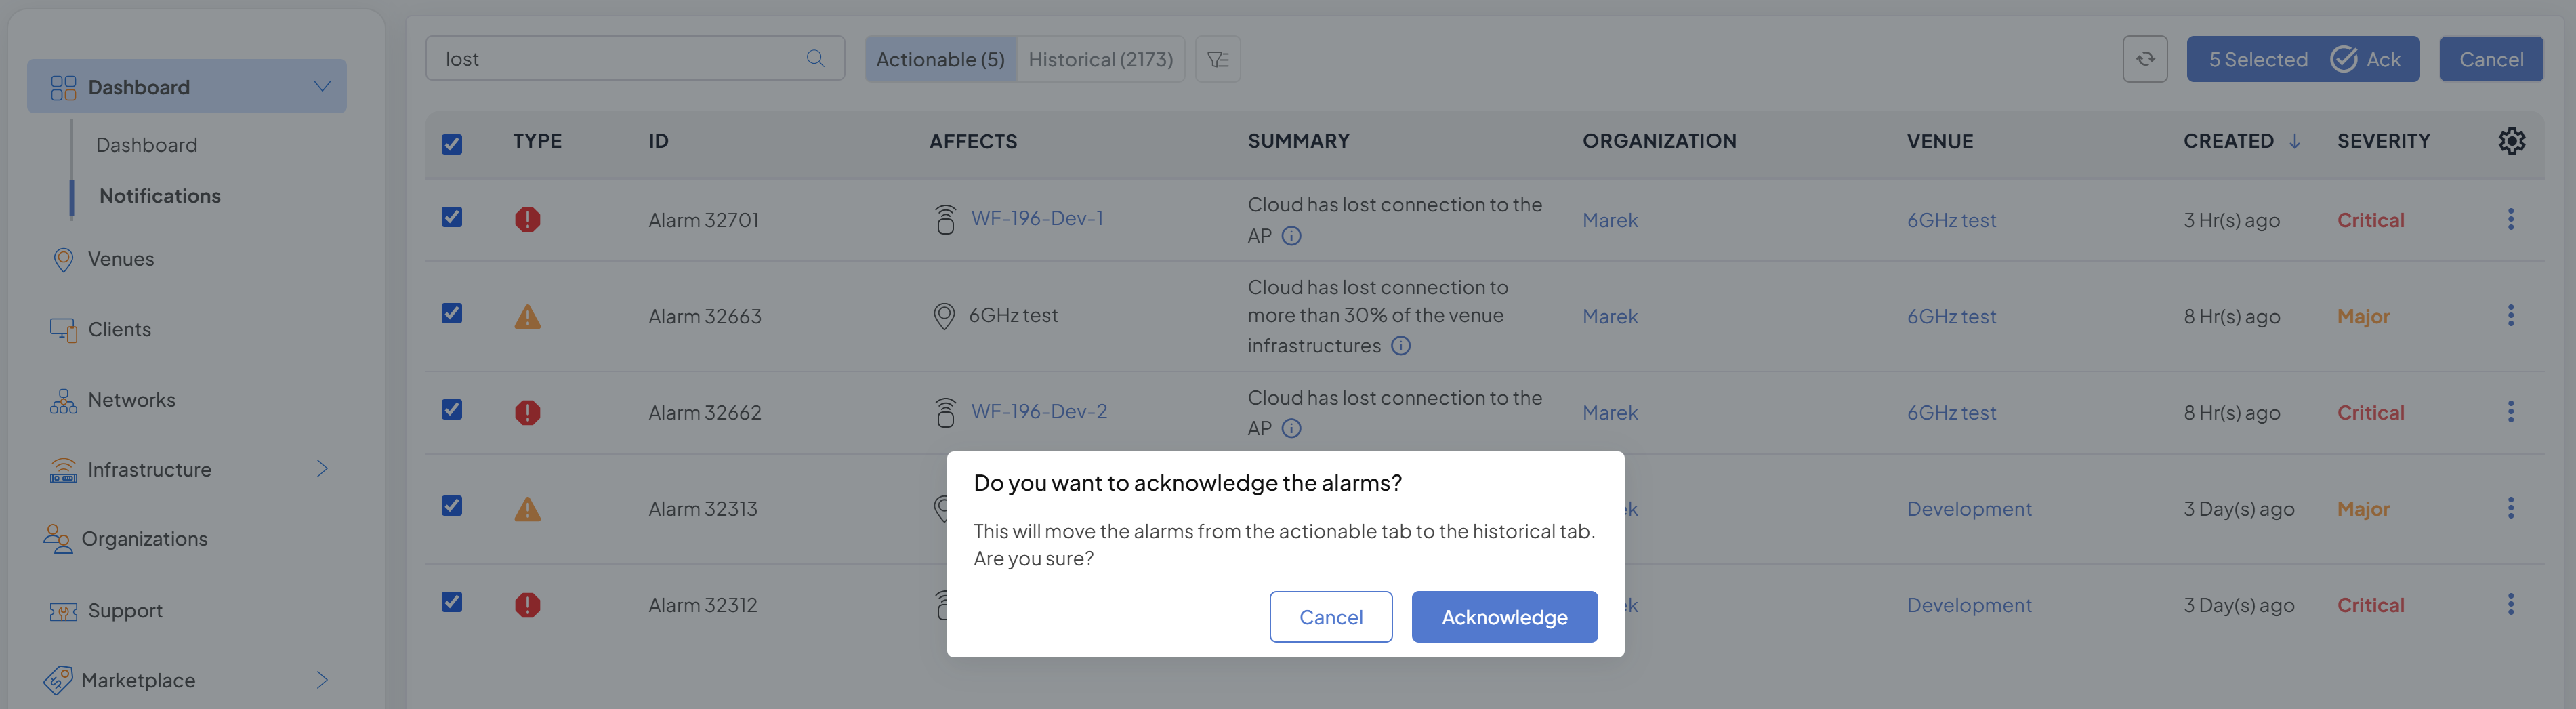
Step-3: To acknowledge more such notifications, please use the Bulk Ack feature available in the table options as shown below. Note that the bulk acknowledgement option displays only when the filter is selected to display Actionable Notifications.

You can manually select the actionable notifications one by one after scrolling down through the sequence, or you can use the search box to select a certain set of them and click the option Bulk Ack as shown below.

Once you are presented with the confirmation dialog, select Acknowledge. These will move to the Historical section.
Exporting Notifications
Step-1: From the table view, click on the Export option in the breadcrumb. 
The export is available in XLSX format, and only the details that are available in the Selected quick filter or custom filter will be exported. The details that are not matching the applied filter would not be exported.
Step-2: Find the exported file in the Downloads Folder that is set on the browser that you are currently into. The file name is saved as example: Notifications-(Actionable)-(20).xlsx or Notifications-(Historical)-(45).xlsx
The following information is exported
Column Name | Description |
Type | The type of the notification (Alarm, Notification, Ticket). |
Id | The Id of the notification. |
Affected Entity | The type of entity that is affected |
Affects | It depicts which entity is affected |
Summary | The summary of the notifications |
Description | The description of the notifications |
Venue | The venue details related to the affected entity. |
Created | The timestamp at which the notification is created. |
Severity | The severity of the notification (Minor, Major, Critical) |
FAQs
Q: Is it possible to delete notifications?
A: No, notifications cannot be deleted. If removal is necessary, please reach out to Shasta Support through the MSP Admin, and our team will be happy to assist you.
For further assistance if you encounter issues, please reach out to Shasta Cloud support.
Article Revision: 3.2
Was this article helpful?
That’s Great!
Thank you for your feedback
Sorry! We couldn't be helpful
Thank you for your feedback
Feedback sent
We appreciate your effort and will try to fix the article